Dataflow Symbols and Dataflow Repeaters
This page describes dataflow symbols and dataflow repeaters in DGLux5 and includes basic operations and tutorials.
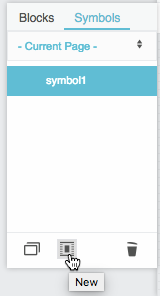
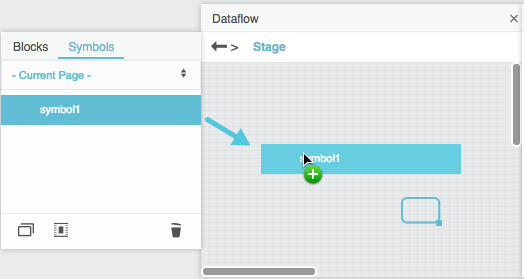
A dataflow symbol is a dataflow model without a parent object. You access existing dataflow symbols in the symbols panel of the dataflow. The symbols panel is located in a tab next to the block palette. The following image shows the location of the symbols panel.
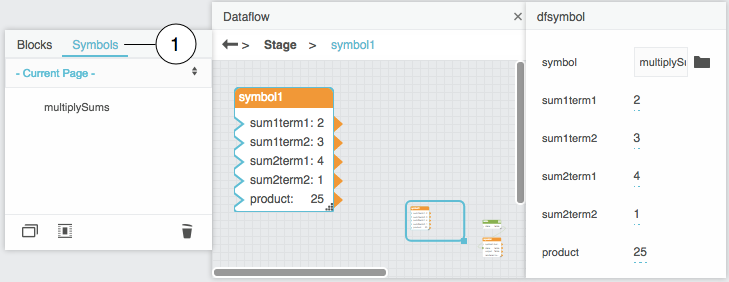
| 1 | Symbols panel |
After you create a dataflow symbol, you can add instances of that symbol to dataflow models. A symbol instance is a single dataflow block that represents the symbol. Instances of a symbol are identical to one another except where affected by symbol parameters that you create. If a symbol does not have parameters, all of its instances are identical.
You can edit a symbol, or you can edit a symbol instance. Changes to a symbol affect all instances of the symbol. Changes to a symbol instance affect only that instance. Only the following aspects of a symbol instance can be edited.
- Position and size
- Page code name and block label
- Which properties are pinned and unpinned
- Parameter values
A dataflow repeater is a Repeater block. A Repeater block takes a table and a dataflow symbol as input. Then, the Repeater block returns an output table that describes parameter values of the input symbol for each row of the input table.
How to Create a Dataflow Symbol
You can create a new dataflow symbol in two ways.
How to Create a New Dataflow Symbol via Block Conversion
To create a new dataflow symbol:
- Add blocks to any dataflow model.
Select the blocks to convert.
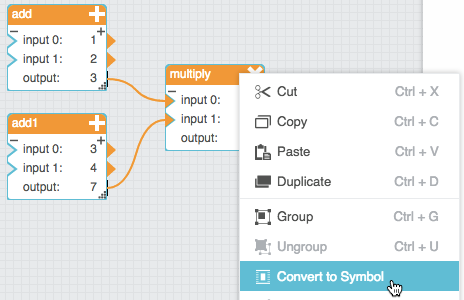
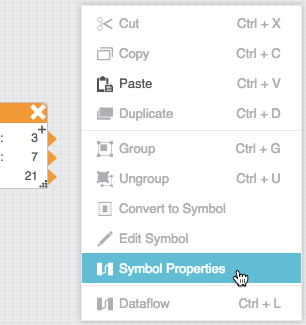
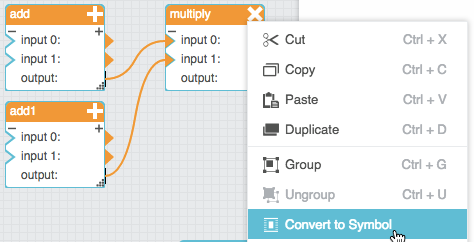
Right-click one of the selected blocks, and choose Convert to Symbol.
When prompted, enter a symbol name, and click OK.

In the current dataflow model, the selected blocks are replaced by a symbol instance. In the symbols panel, the new symbol appears in the symbols list.
How to Create a New Dataflow Symbol via the Symbols Panel
To create a new dataflow symbol and also enter symbol editing mode for that symbol:
- Make sure the symbols panel, not the block palette, is selected.
Click the
 New icon.
When prompted, enter a symbol name, and click OK.
How to Edit a Dataflow Symbol
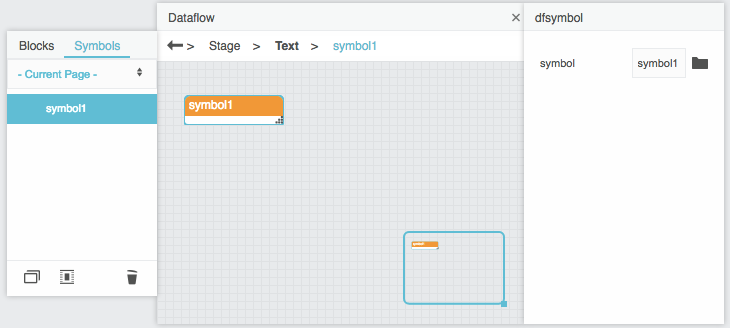
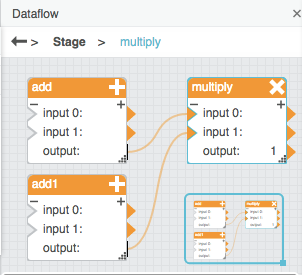
You edit a dataflow symbol in symbol editing mode for that symbol. When you are in symbol editing mode, the dataflow view contains the dataflow model for the symbol, and three buttons appear that let you close, apply, or save the current dataflow model. These buttons appear only in symbol editing mode. The following image shows symbol editing mode.

| 1 | Symbol editing mode buttons |
If you are in symbol editing mode for multiple symbols simultaneously, the dataflow view for each symbol appears in a separate floating panel.
While in symbol editing mode, you can make two kinds of changes. The first kind of change affects the symbol dataflow model. The second kind of change exposes and manages symbol parameters.
Symbol parameters appear as block properties for symbol instances. These properties behave like other dataflow block properties, in that the property values can be different for each symbol instance. All symbol instance properties are unpinned by default.
Notes
- You always must click OK to save changes. Changes to a dataflow symbol are not saved automatically when you leave symbol editing mode.
- While you are in symbol editing mode for a dataflow symbol, you can click Apply to temporarily apply changes to all symbol instances. If you click Apply but do not click OK, your changes are lost when you exit symbol editing mode.
How to Enter Symbol Editing Mode
The following interactions enter symbol editing mode for a dataflow symbol:
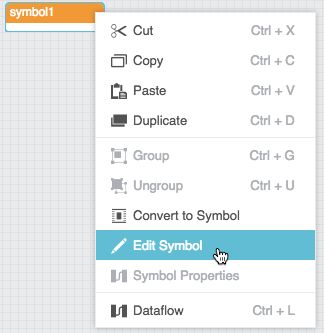
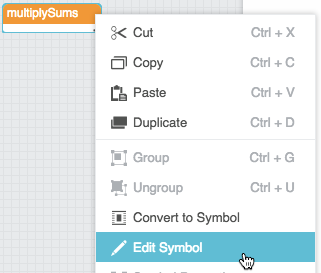
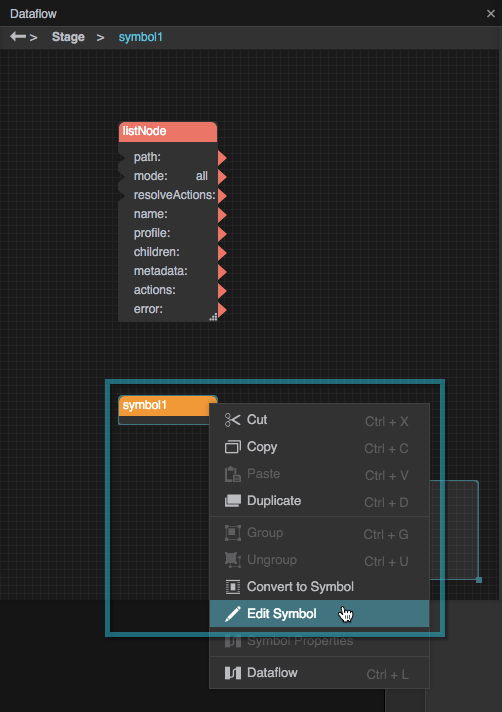
- Right-click a symbol instance in the dataflow window, and choose
 Edit Symbol.
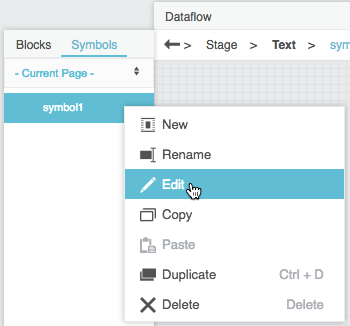
 - Right-click a symbol in the symbols panel, and choose Edit.
- In the symbols panel, click the New icon, and then specify a name for the new symbol.
The following image shows how to enter symbol editing mode via the dataflow window.
The following image shows how to enter symbol editing mode via the symbols panel.
How to Edit a Symbol Dataflow Model
Changes made to a symbol dataflow model affect all instances of that symbol.
To edit a symbol dataflow model:
- Make sure you have entered symbol editing mode.
Edit the dataflow model.
For example, you can do the following:
- Add blocks.
- Rename, move, and delete blocks.
- Edit block properties.
- Create and delete bindings.
- If you want to temporarily apply your changes to symbol instances, click Apply.
- Always click OK to save changes.
How to Edit Symbol Parameters
Symbol parameter values can be different for each symbol instance.
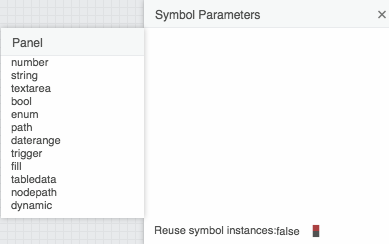
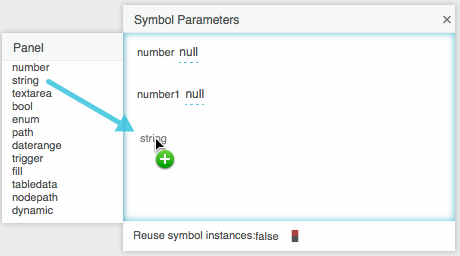
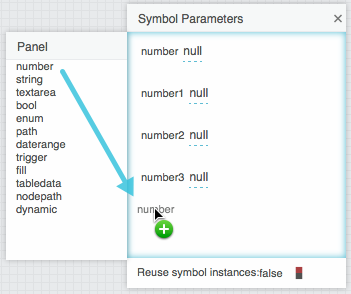
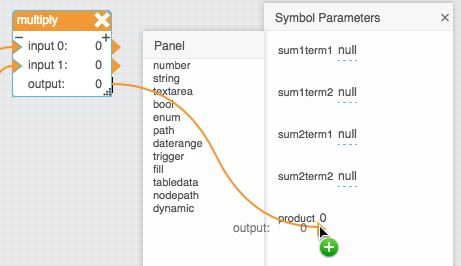
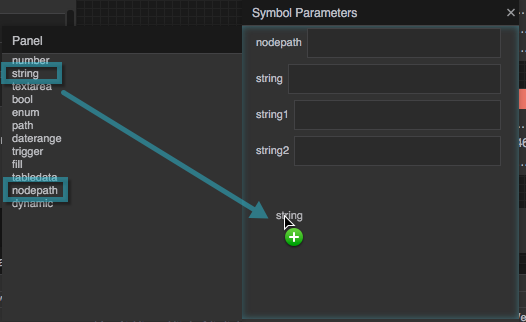
You create parameters using a Symbol Parameters pop-up. The leftmost portion of the Symbol Parameters pop-up contains data types that you can add to a symbol. The rightmost portion of the Symbol Parameters pop-up contains the parameters of the current symbol. The following image shows the two portions of the Symbol Parameters pop-up.
To define parameters:
- Make sure you have entered symbol editing mode.
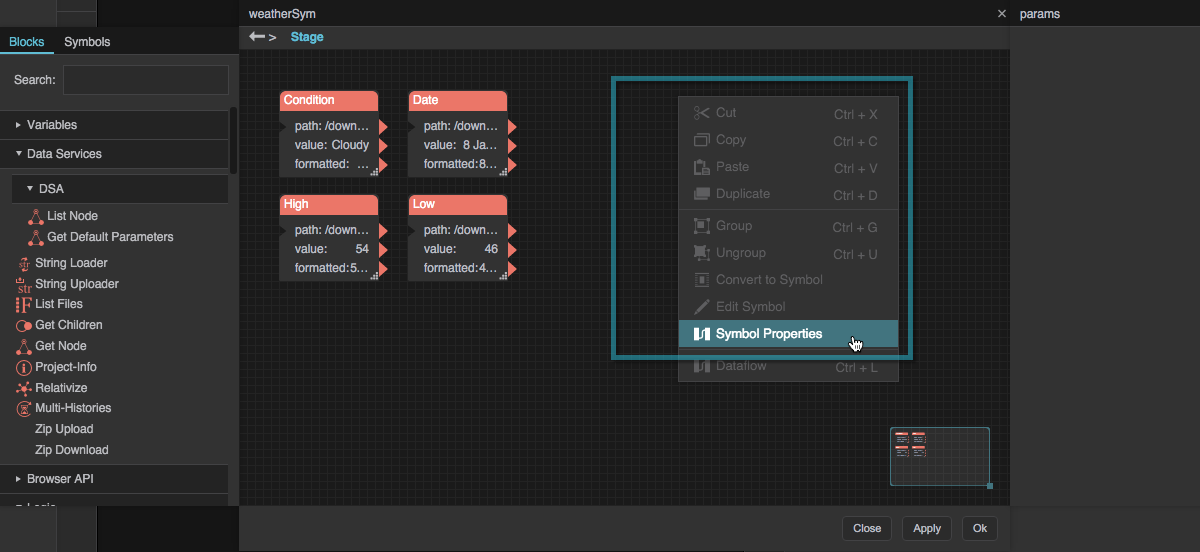
Right-click an empty area in the dataflow window, and choose Symbol Properties.
The Symbol Parameters pop-up appears.
Click and drag a data type, and drop the data type on the rightmost portion of the pop-up.
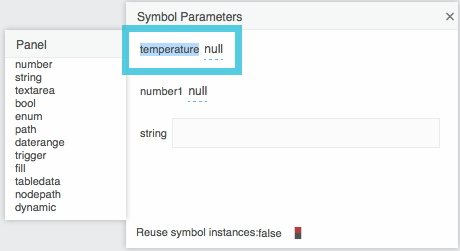
If you want to change the label for this parameter, double-click the label and replace it.
If you want to define a default value for this parameter, enter the value.

If you want to cause this parameter value to determine a block property inside the symbol, create a binding from the parameter to the block property.
- Always click OK to save changes.
How to Add a Dataflow Symbol Instance
To add a dataflow symbol instance to a dataflow model:
- Open the dataflow model.
- Make sure the symbols panel, not the block palette, is selected.
- Find the symbol name in the symbols panel.
Drag the symbol name, and drop it on the dataflow window.
Dataflow Symbol and Repeater Tutorials
These examples show you how to create some simple dataflow symbols and dataflow repeaters.
Tutorial: Multiplication Dataflow Symbol
This example shows you how to create a simple dataflow symbol that multiplies two sums.
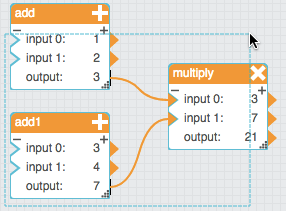
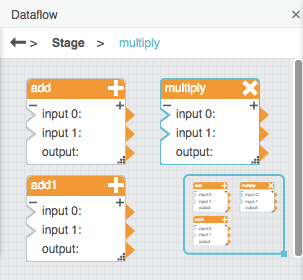
- Open any dataflow model.
Bind the output properties of the Add blocks to the input properties of the Multiply block.
- Select all three dataflow blocks.
Right-click one of the selected blocks, and choose
Convert to Symbol.
Enter
multiplySumsas the symbol name, and click OK.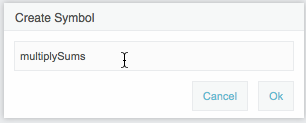
The three blocks are replaced by a symbol instance. In the symbols panel, multiplySums appears in the symbols list.
Right-click the symbol instance, and select
Edit Symbol.
You enter symbol editing mode for the multiplySums symbol.
Right-click the background of the symbol editing window, and select
 Symbol Properties.

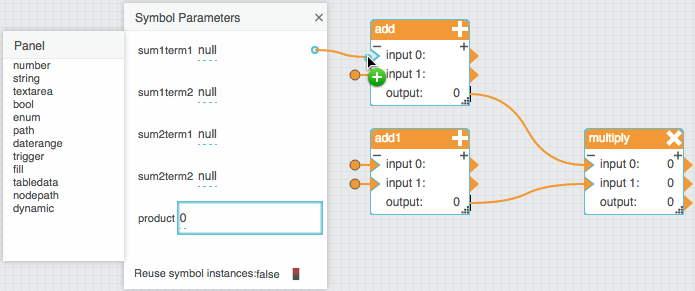
Drag five number parameters to the rightmost portion of the Symbol Parameters dialog.
- Edit the labels of the five parameters to the following labels:
sum1term1sum1term2sum2term1sum2term2product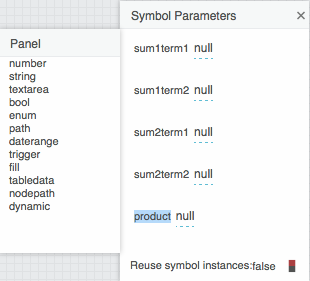
Bind the first four symbol parameters to the input properties of the Add blocks.
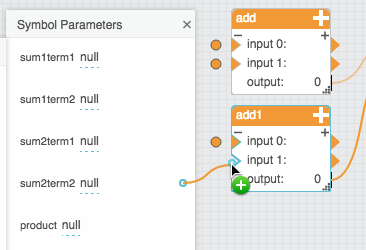
Bind the output property of the Multiply block to the product symbol parameter.
- Click OK to exit symbol editing mode.
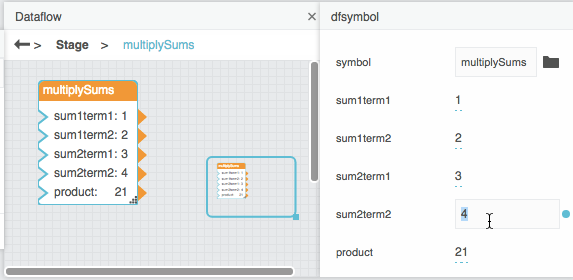
In the dataflow window, select the multiplySums symbol instance.
The parameters of the multiplySums symbol appear in the block properties panel.
- To cause properties to appear in the visual block in the dataflow window, pin the properties.
To test your symbol, enter numbers for the first four properties.
The product property updates.
Tutorial: Multiplication Dataflow Repeater
This example uses the dataflow symbol created above to create a simple dataflow repeater.
- Create the multiplySums dataflow symbol as described above.
- Open any dataflow model.
Add a Table block and a Repeater block to the dataflow model.
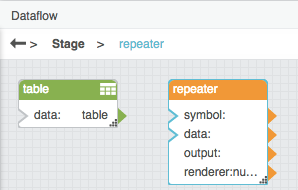
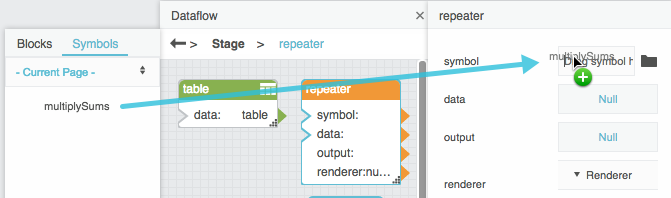
With the Repeater block selected, open the symbols panel, and drag the multiplySums symbol name to the symbol property.
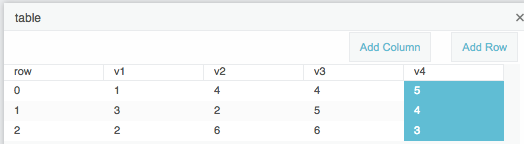
Select the Table block, and invoke the value of the data property to open the table.

Edit the table so that the table contains four columns of numbers.
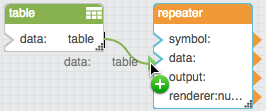
Bind the data property of the Table block to the data property of the Repeater block.
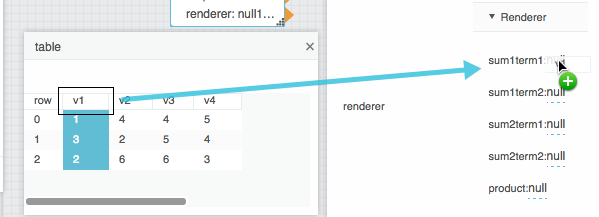
With the Repeater block selected, invoke the value of the data property to open the table.
Expand the Renderer section in the block properties panel.
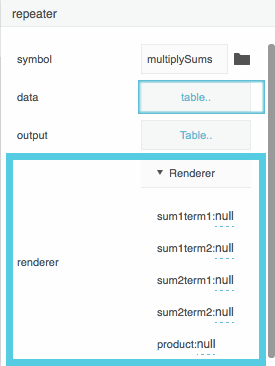
Bind the table columns to the first four Renderer properties by dragging each column header.
To view the output of the repeater, invoke the value of the output property.

This output table contains a row for each input table row. It contains a column for each symbol property, including the
productproperty.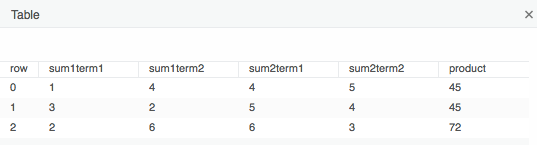
Tutorial: City Weather Tracking Dataflow Symbol
This example shows you how to create a dataflow symbol that combines data collected by Load Value blocks. This particular example requires the DSA Weather DSLink. To connect to the Weather DSLink, follow the steps in Access DSLink data.
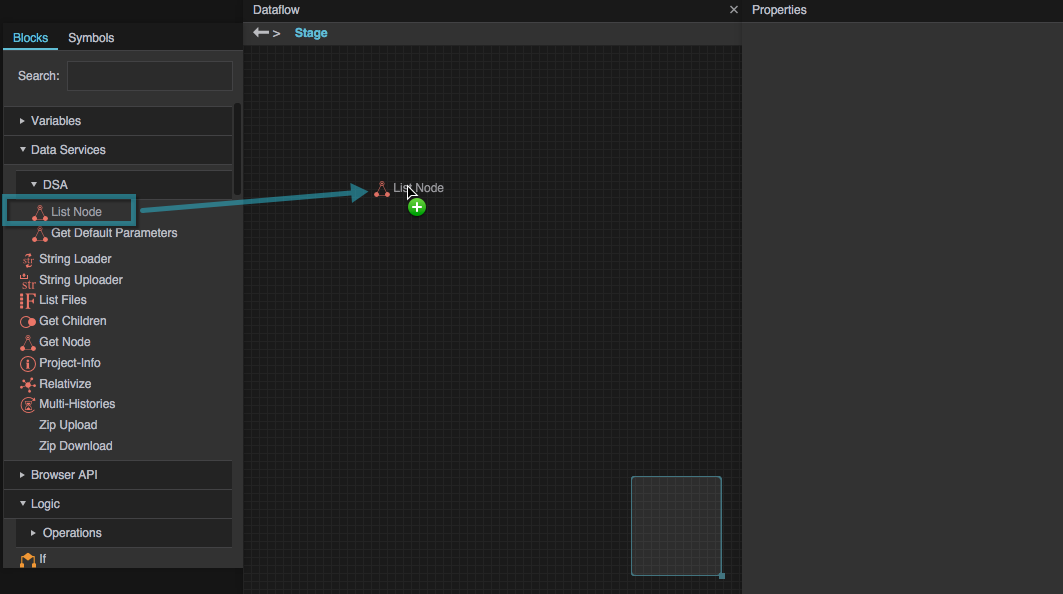
- Open any dataflow model.
Add a List Node block.
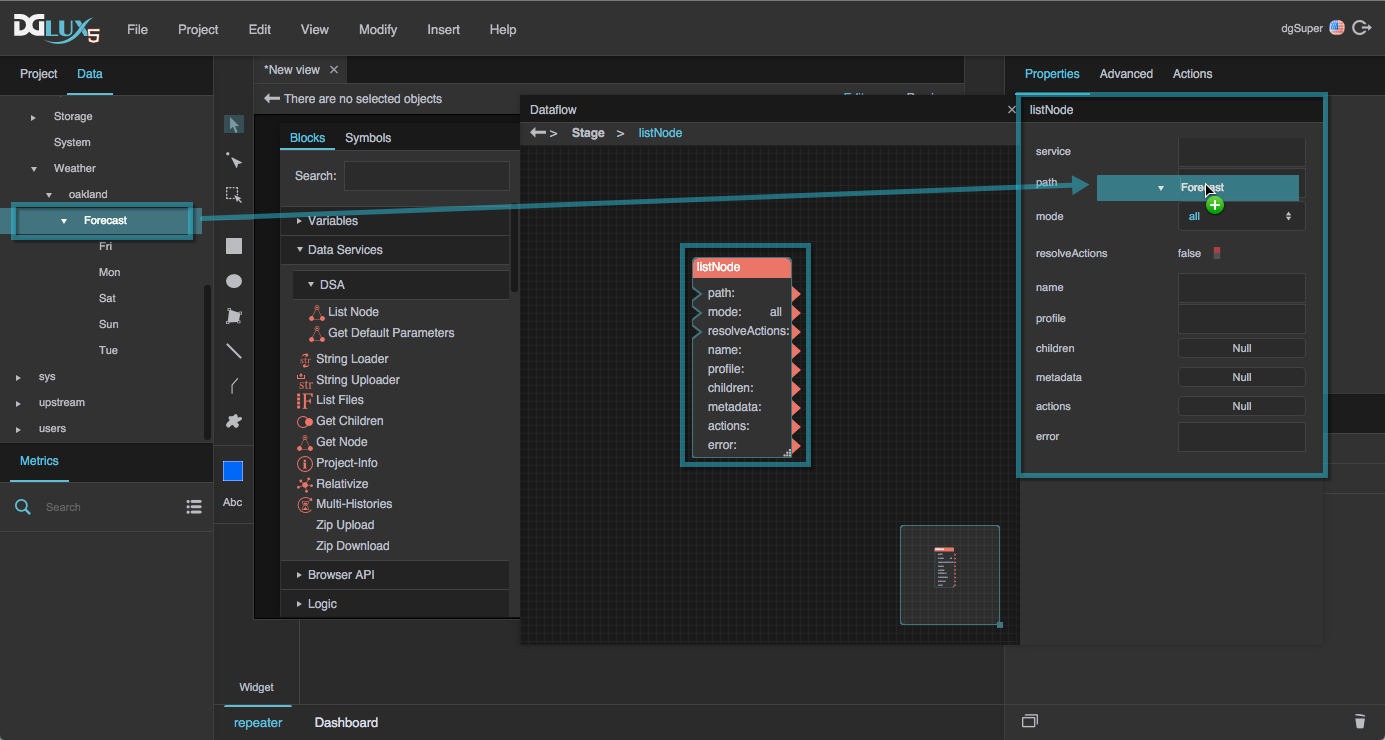
In the Data panel, find downstream > Weather > <city> > Forecast. With the List Node block selected, drag the Forecast node to the path property.
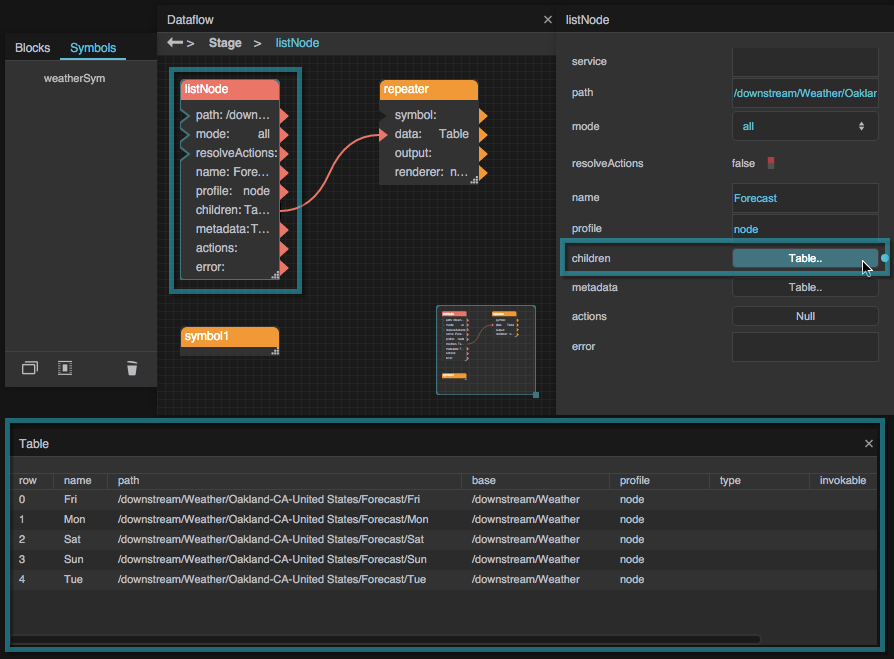
Invoke the value of the List Node block’s children property to view the table of children.
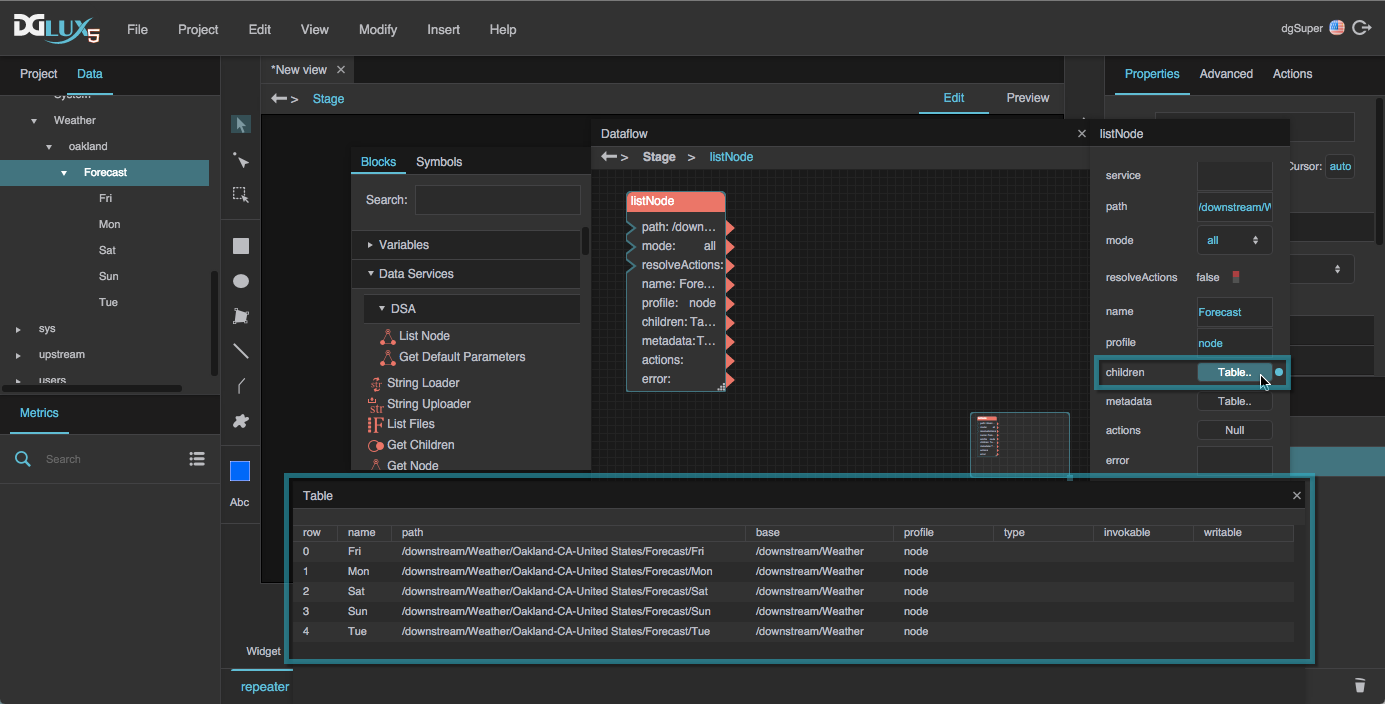
In the Data panel, select one of the children of the Forecast node.
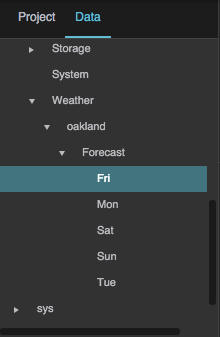
Drag each of this node's metrics from the Metrics panel to the dataflow window.
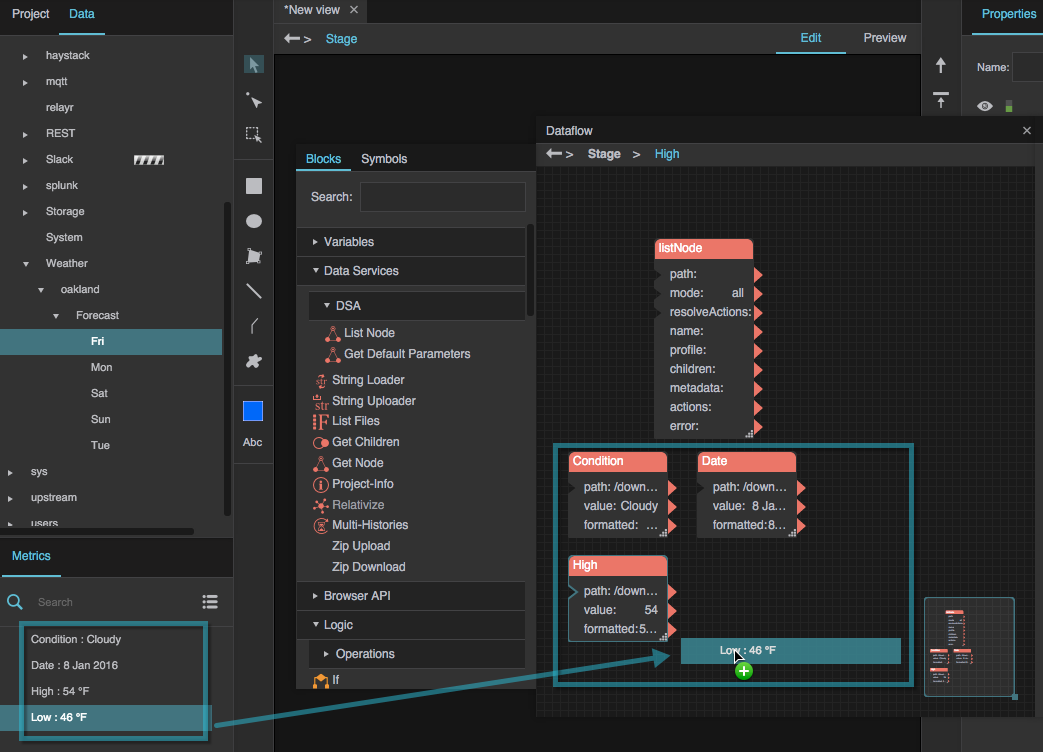
Select the four Load Value blocks and select
Convert to Symbol. Name the symbol weatherDay.

The four blocks are replaced by a single symbol block.
Right-click the symbol block and select
Edit Symbol.
You enter symbol editing mode for the weatherDay symbol.
Right-click the background of the symbol editing window, and select
Symbol Properties.
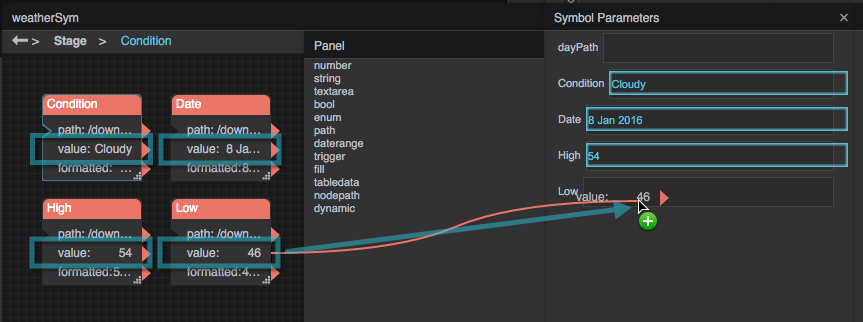
Add a nodepath property and four string properties.
- Name the properties as follows:
dayPathConditionDateHighLow
Bind the value properties of the List Node blocks to the string symbol parameters.
Bind one of the children of the Forecast node from the Data panel to the
dayPathsymbol parameter.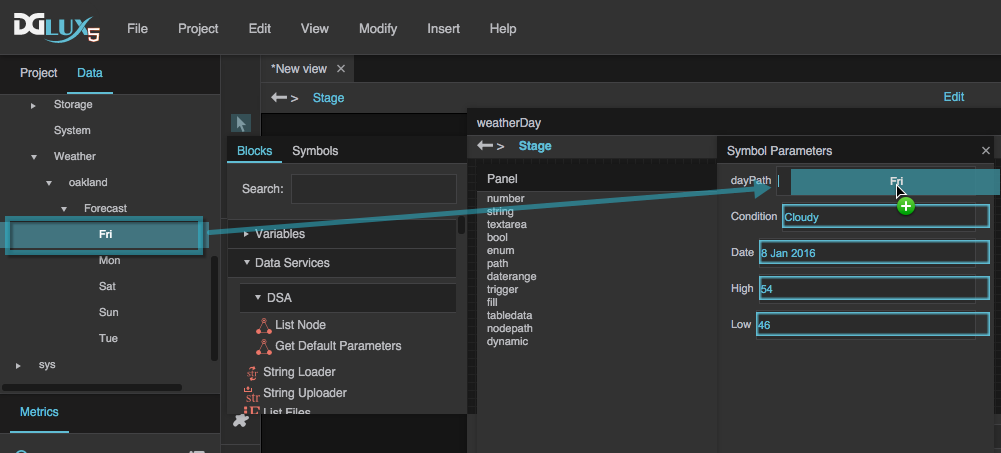
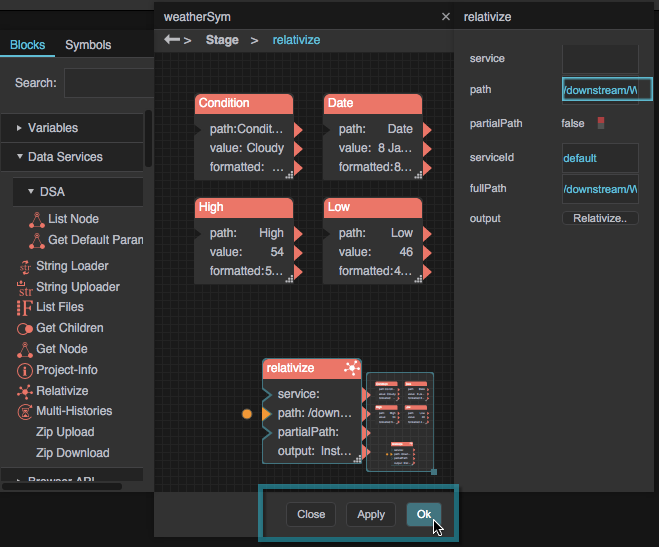
Add a Relativize block to the symbol editing window.

Bind the
dayPathsymbol parameter to the path property of the Relativize block.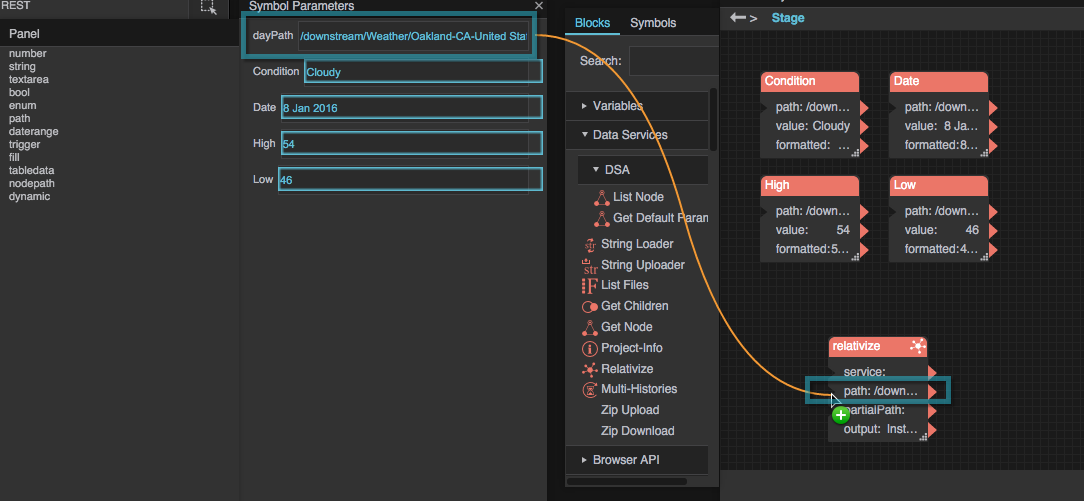
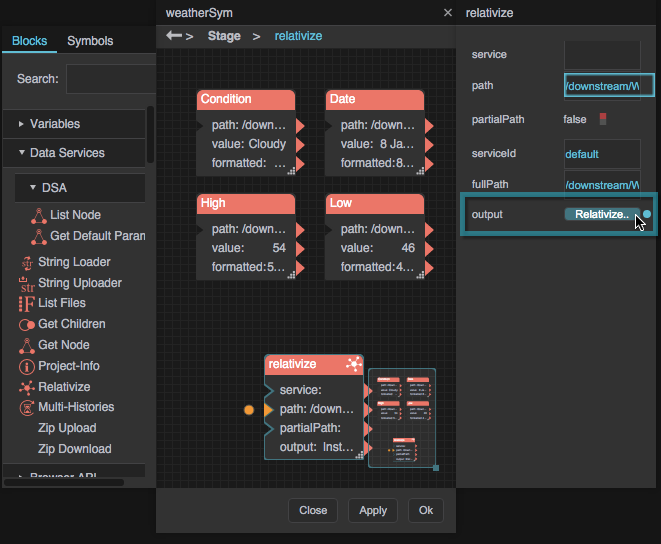
Select the Relativize block, and click the Relativize button next to output.
In the pop-up, click Select All, and then click Relativize.
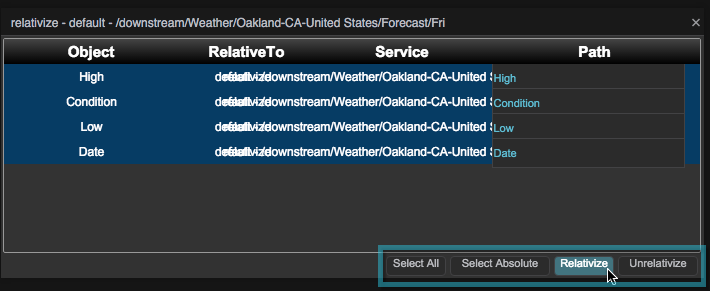
Close the pop-up, and click OK to close the symbol editing window.
To test your symbol, select the symbol and change the value of the dayPath symbol property. The other four properties update when you do this.
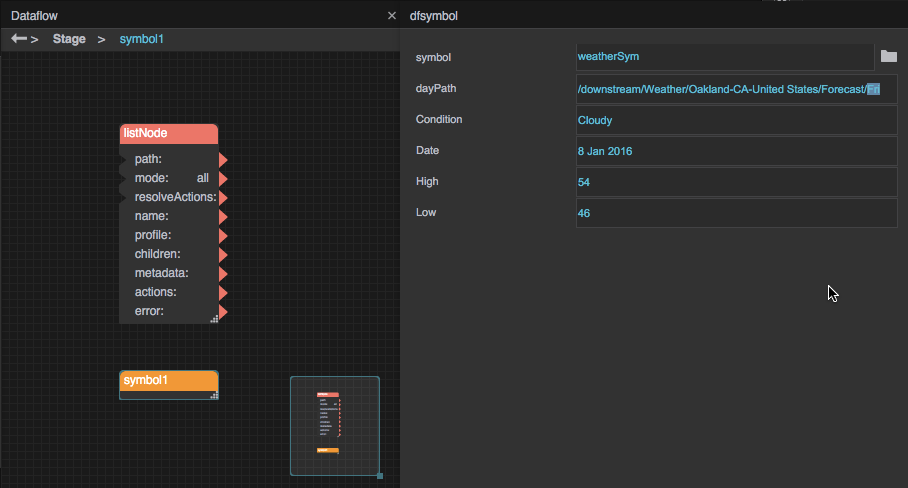
If you want, you can pin properties so that they will visually appear in the block.
Tutorial: City Weather Tracking Dataflow Repeater
This example uses the weatherDay symbol to create a dataflow repeater.
If you used non-DSA data to create the symbol, use the output property of the Get Children block instead of the children property of the List Node block.
- Create the
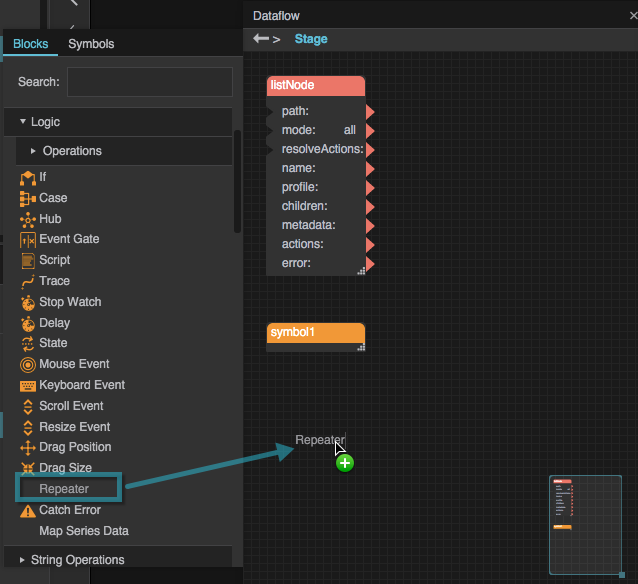
weatherDaydataflow symbol as described above. Add a Repeater block to the dataflow window.
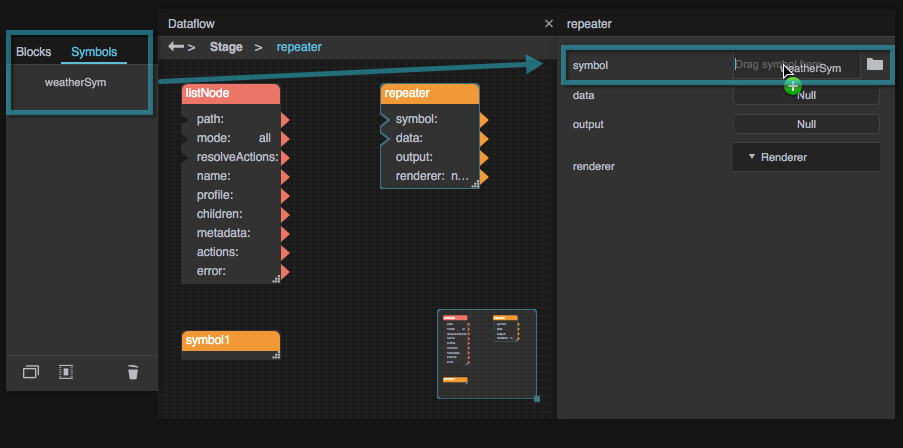
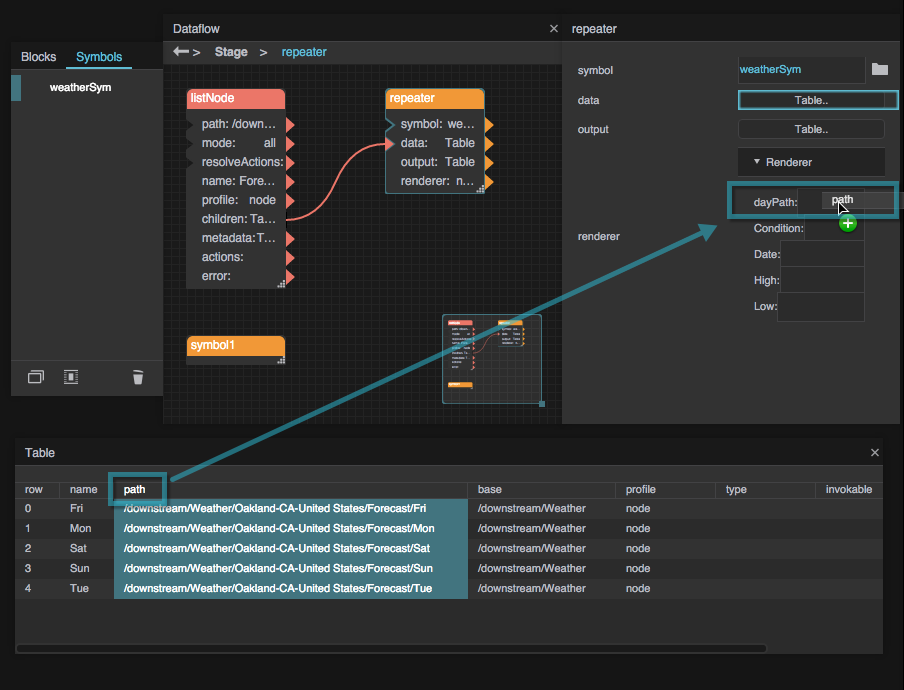
With the Repeater block selected, open the Symbols panel of the dataflow window, and drag weatherDay to the symbol property.
Select the List Node block that you created when you made the
weatherDaysymbol, and bind the children table to the data property of the repeater.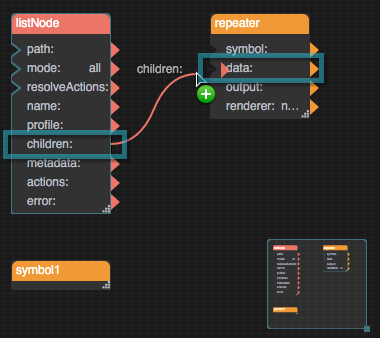
With the List Node block selected, click the button next to children to open the table.
Select the Repeater block, and bind the path table column to the dayPath renderer property by dragging the column header.
To view the output of the repeater, click the button next to output.
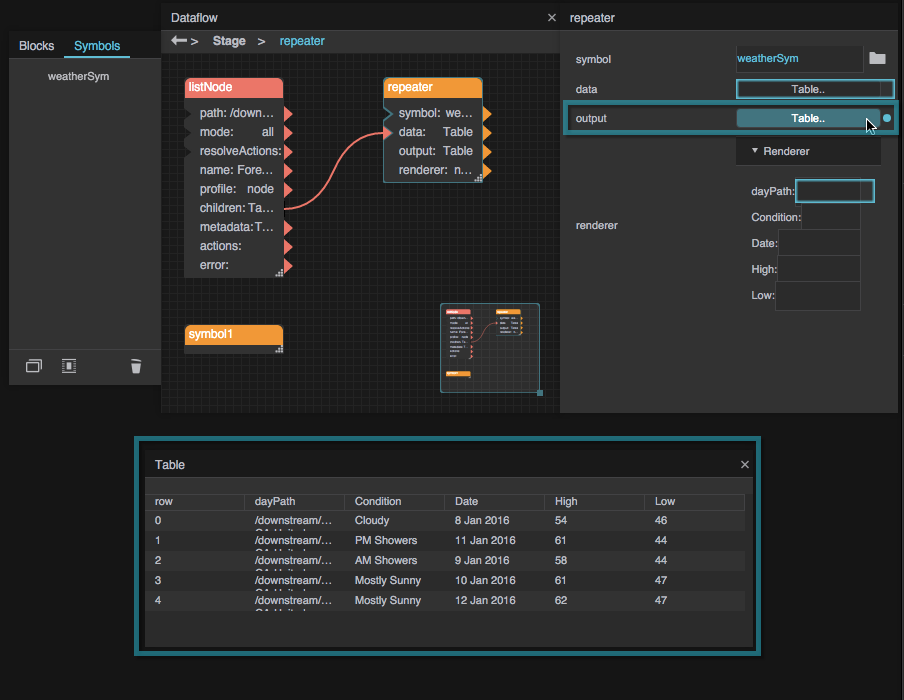
This output table contains a row for each instance of the dataflow symbol.