Install DGLux5 for Niagara AX
Use this guide to install the DGLux5 Service on a remote or local Niagara AX station or on a JACE device.
Niagara AX Compatibility
The DGLux5 Service is compatible with Niagara AX 3.7 and higher.
The following Niagara AX modules are required:
- alarm
- baja
- bajaui
- bql
- control
- driver
- file
- gx
- history
- platform
- web
- workbench
Browser Compatibility
DGLux5 is a 100% HTML5 application that does not require any special browser plugins. The latest version of Google Chrome is recommended for the best experience.
Currently, the supported web browsers are:
- Google Chrome 48+
- Microsoft Edge 27+
- Mozilla Firefox 40+
- Opera 27+
- Apple Safari 8.0.8+
How to Install on a Local Workstation
These steps demonstrate how to install DGLux5 on a local workstation or Niagara AX Supervisor. Typically, local installation is done for the integrator's copy of the engineering tool.
- Download the DGLux5 AX Supervisor installation file. (Requires dglux.com password)
- Stop all running stations, and close all instances of the engineering tool.
- Change the extension of the installation file from
.distto.zip. Unzip the file.
If the file unzips successfully, the
dglux5,META-INF, andmodulesdirectories appear, and thedglux5directory contains theappandprojfolders.
- Move the
dglux5andmodulesdirectories to the system root directory of the version of Niagara being used. Typically, this isC:\Niagara\Niagara-3.n.nnn\, where3.n.nnnis the Niagara version number. - When prompted to merge the
modulesdirectories, select Yes. - Start the station.
- Add the DGLux5 Service:
If your Niagara Workbench environment does not already include the Palette, add the Palette by selecting Windows > Sidebars > Palette, as shown in the following image.

In the palette, browse to the
dglogikmodule, as shown in the following image, and click OK.
The
DGLuxServicemodule is added to the Palette.Drag the
DGLux5Servicemodule from the Palette, as shown in the following image, and drop it on theServicesnode in the station database in the panel above (station:|slot:/Services).
- Go to
<server>:port/dglux5, for examplelocalhost:8080/dglux5. - To request a license, select Help > License, and then click the Request License button.
The following video demonstrates how to install the Project Assist Viewer on a local workstation. To install DGLux5 on a local workstation, you can use the same steps, but use the DGLux5 distribution file instead of the Project Assist Viewer file.
How to Install on a Remote Station
These steps demonstrate how to install DGLux5 on a remote computer or on a JACE device with sufficient space.
- Download the DGLux5 AX Supervisor installation file. (Requires dglux.com password)
- Stop all running stations.
- Open the remote platform.
- Open the Distribution File Installer in the remote platform.
- When prompted, navigate to the
.distfile on your local computer, and click Install. - Start the station.
- Add the DGLux5 Service:
- If your Niagara Workbench environment does not already include the Palette, add the Palette by selecting Windows > Sidebars > Palette.
In the Palette, browse to the
dglogikmodule, and click OK.The
DGLuxServicemodule is added to the Palette.- Drag the
DGLux5Servicemodule from the Palette, and drop it on theServicesnode in the station database in the panel above (station:|slot:/Services).
- Go to
<server>:port/dglux5, for examplelocalhost:8080/dglux5. - To request a license, select Help > License, and then click the Request License button.
How to Install on a JACE Device
These steps demonstrate how to make the best use of storage space when installing DGLux5 on a JACE device. These steps demonstrate how to install the core of DGLux5, without any templates or libraries, and then import individual templates or libraries. If your JACE device has sufficient space, you can do a regular remote installation.
Review the following storage requirements when deciding which components to install as part of a DGLux5 installation.
| Component | Importance | Size |
|---|---|---|
| DGLux5 core only | Required | 19.5 MB |
| Project Assist 2.0 templates | Optional | 28.1 MB including HVAC2 library 3 MB without HVAC2 library 750 kB without widgets or styles (not recommended) |
| Other templates | Optional | 44–500 KB per template |
| Widget Libraries | Optional | 103 KB – 20.4 MB per library |
- Download the DGLux5 AX JACE installation file. (Requires dglux.com password)
- Refer to the table above to decide which components to include.
- Using the installation file that you downloaded in step 1, follow the steps to install on a remote station.
- To import templates and libraries, such as
Dashboards.zip,HVAC2.zip, and the Project Assist template, download the templates and libraries. - In your web browser, log in to DGLux5.
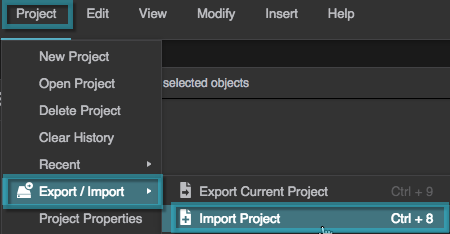
Select Project > Export/Import > Import Project, as shown in the following image.
Click Choose File, as shown in the following image.

Select the widget or template file.
Do not unzip the file.

- Click OK.
How to Update the DGLux5 JAR File
If you need to update only the dglogik.jar file, you can do so from the Niagara workbench.
- Stop all running stations.
- Go to the Installed Software utility in Niagara AX, and select Install from File.
- When prompted, browse to the new
dglogik.jarfile and select it. - Close and reopen the Workbench.
Out-of-Date Modules
When you use the Installed Software utility in the Niagara workbench, the module versions installed on the remote host are checked against those that are installed locally. If any modules on the remote machine are found to be out of date, you are given the option to install the newer versions.
In general, uncheck modules unless you are sure you want to update them. Do not update modules without a reason to do so.
How to Launch DGLux5 and Log In
A Niagara user with the appropriate permissions outlined below can simply visit:
<server>:port/dglux5
Niagara Users
DGLux5 obeys the Niagara security model. Thus, non-Super users need the following permissions to run DGLux5:
- The DGLux5Service – typically "slot:/Services/DgLux5Service" or use the service ord "service:dglogik :DGLux5Service" (remove the space).
- To access designer, a user must have write permission on the DGLux5Service.
- The Station database - slot:/
- The History database – history:
- If the user is using a nav file, they will need permission to access that file - file:^nav/example.nav
How to Set Up a Nav File for Niagara Users
Here are some examples of how to add DGLux5 to a Nav file:
- To access /dglux5, use the ord "dglux5:"
- To access a specific project, use an ord like "dglux5:proj=exampleProject"
- To access a specific page in a project, use an ord like "dglux5:proj=exampleProject&path=page.dg5"
This video demonstrates how to set up a Nav file in Niagara that will take your users to a particular page in DGLux5 when they log in.
To set landing pages for users of your Project Assist project, see Deploy a Project.