Distributed Services Architecture (DSA)
DSA brings together entities like devices, services, and applications into one data model that updates in real time. By representing these entities as one system, DSA makes possible or simplifies various tasks, such as analytics, inter-device communication, distributed computing, and application development.
You can read more about DSA on the DSA home page.
Structure of DSA
DSA represents each of the entities in the system as one of the following types:
- Broker: Brokers manage security, links, subscriptions, and node permissions. Other entities in the system can operate only as permitted by a broker. A broker also saves configuration data to disk. A broker also routes data from a source to a destination.
- DSLink: DSLinks create, publish, and interact with data. DSLinks, which connect to brokers, can subscribe to data in the DSA system, to receive data whenever the data changes. You can download DSLinks from IOT-DSA on Github.
- Node: General term for the components connected by DSA. Node can be brokers, DSLinks, metrics, actions, attributes, or folders containing other nodes.
- Metric: A metric is a key/value pair. The value can be any of the data types listed in Supported Data Types, including an arbitrary value map. A metric can originate on any broker, DSLink, or other node.
- Data Node: Data nodes enable data to be stored on the broker's host server.
- Action: An action is an invocable command that can affect an entity. For example, an action might create a node or set a metric value. An action can exist on any broker, DSLink, other node, or metric.
- Attribute: An attribute is metadata for the selected entity, represented as a key/value pair. An attribute can exist on any broker, DSLink, other node, or metric.
Upstream and Downstream Connections
A downstream entity requests permission, and an upstream entity grants or refuses that permission. A broker is always upstream from its DSLinks. A broker can be either upstream or downstream from another broker. Upstream and downstream connections are important concepts to understand when you configure permissions for multiple servers or multiple brokers on one server.
Connecting Two DSA Installations (Brokers)
When you connect two DSA installations, one is an upstream broker and the other is a downstream broker.
For an example, see this video.
To connect two DSA installations:
- From the downstream broker, right-click sys > upstream, and choose Add Upstream Connection.
- Specify connection settings as follows:
- Name: The node name that you want to appear in the downstream tree to represent the upstream broker.
- Url: The connection endpoint; for example
http://localhost:8081/conn. - Broker Name: The name that you want to appear in the upstream tree to represent the downstream broker.
- Group: The permission group for the upstream broker.
To remove the downstream broker from quarantine:
- Log into the upstream broker.
- Choose sys > quarantine > Deauthorize, and specify the downstream broker.
Supported Data Types
DSA supports the following data types:
- String: A series of characters or an empty string.
- Number: A number or a null value.
- Bool: A true or false value.
- Array: An array object or a null value. The values in the array are of the dynamic data type. An example array of number values is
[2,3,5,7,11]. An example array of map values is[{"hello":"world","number":1},{"hello":"world"}]. - Map: A map object containing key/value pairs, or a null value. The key is always a string, and the value is the dynamic data type. An example value is
{"hello":"world","primes":[2,3,5,7,11]}. - Binary: A byte array expressed as a string, or a null value. The string begins with
\u001Bytes:and ends with a byte array encoded in base 64. - Dynamic: A value that can be any of the above types.
Installing DSA
To install DSA on Mac OS X, Microsoft Windows, Linux, or other platforms, follow the steps in the relevant video on this page, depending on your platform.
If you are installing DSA on a Raspberry Pi, BeagleBone Black, or DGBox, you can also follow the steps in this blog post and video.
If you install DSA with DG Solution Builder, and do not have a DG Solution Builder license, follow the steps to request a license when you are prompted to do so.
Orientation to the DG Solution Builder Data and Metrics Panels with DSA
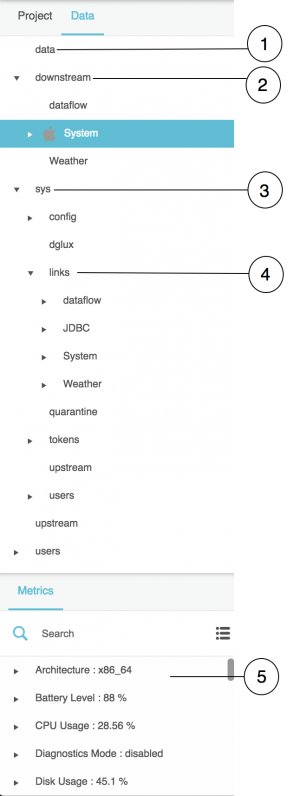
The following image shows the Data panel and Metrics panel in DG Solution Builder when DSA is used.
| 1 | data node | 2 | downstream node | 3 | sys node |
| 4 | sys > links node | 5 | metrics at the currently selected node (downstream > System) |
Storing Data on the DSA Server
To store data on the DSA Server:
- In the Data panel, right-click the data node.
Choose Add > Node or Add > Value.
The Value option lets you specify a data type.
Without moving the mouse pointer away from the pop-up menu, enter a node name, and optionally choose a data type.
A top-level data node is created.
- In the Metrics panel, right-click the new data node that you created.
- Choose Add > Node or Add > Value to create a child of this node.
- Continue adding nodes until all nodes are represented.
To set a value:
- In the Data panel, select the data node.
- In the Metrics panel, right-click the metric whose value you want to set.
- Choose @set, enter the value, and click Invoke.
To invoke an action on a metric:
- In the Data panel, select the data node.
In the Metrics panel, right-click the metric on which you want to invoke an action.
A pop-up menu of available data actions is displayed.
- Choose the action, enter any required information, and click Invoke.
Installing and Updating a DSLink
To install a DSLink:
- In the Data panel, right-click the sys > links node.
- Choose Install Link, and choose an installation method:
- If you have a link to a ZIP file, choose from Url
- If you have a ZIP file to upload, choose from Zip.
- If the link can be found in IOT-DSA on Github, choose from Repository.
- Specify a name for the new DSLink.
Without moving the mouse pointer away from the pop-up window, click Invoke.
When the link has been successfully installed, a "Success" message appears.
To start the link, right-click the link under sys > links > [link name], and choose Start Link.
When the link has started successfully, it appears under downstream > [link name].
To update a DSLink:
- In the Data panel, right-click the link under sys > links.
- Choose Update and choose an update type, and then click Invoke.
Remote Dataflow
DSA installations feature a dataflow DSLink, also referred to as remote dataflow. This tool is similar to DGLux5 dataflow, described here, also known as local dataflow.
Differences between the two are:
- Remote dataflow is stored on the DSA server with other DSLinks, not in the project files. Therefore, remote dataflow can run even when the project is not open in a browser.
- Certain blocks, such as Browser API blocks, are not available in remote dataflow.
To create a remote dataflow model:
- In the Data panel, right-click downstream > dataflow.
- Choose Create Dataflow.
- Specify a name for the new dataflow model, and click Invoke.
- Choose the new dataflow model at downstream > dataflow > [dataflow model name].
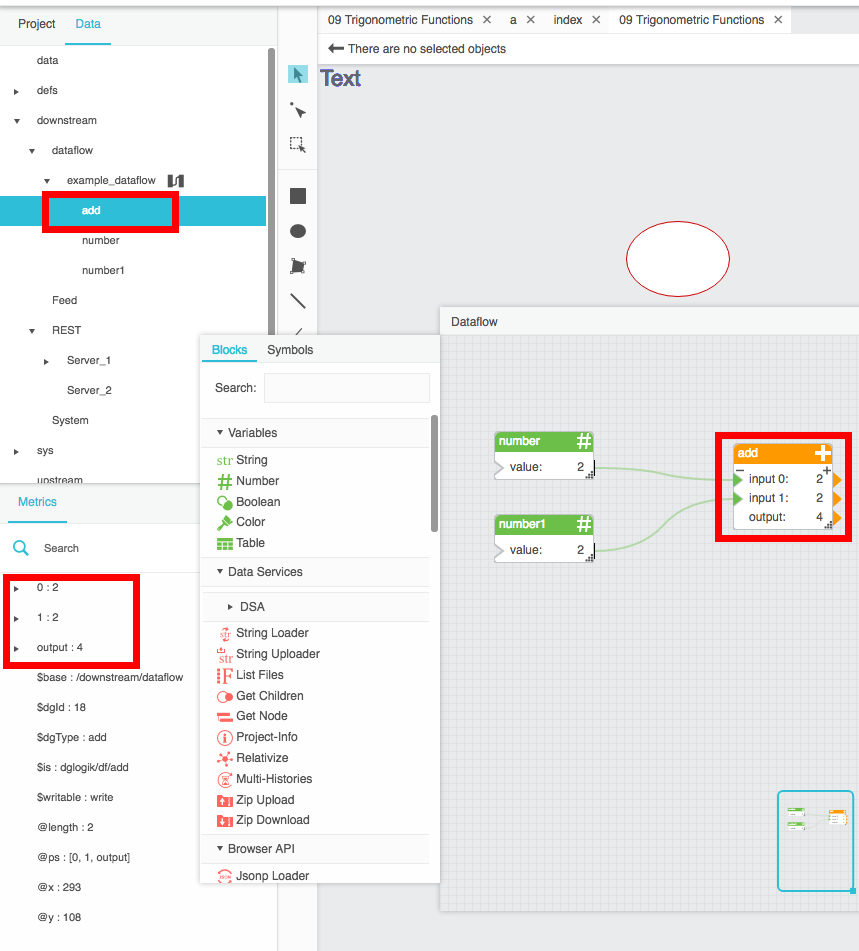
Block property values in a remote dataflow model appear as metrics in the Metrics panel. They can be used like any other metric. The following image demonstrates an example of remote dataflow metrics.
Security and Permissions
See also: Tokens.
Quarantined Brokers and Links
When quarantine is enabled on a broker, any downstream broker or link without an authorized token is held in quarantine. The system can read, subscribe to, and command nodes that are in quarantine, but a node that is in quarantine cannot access other nodes in the system.
Whether quarantine is enabled is specified in dsa/dglux-server/server.json.
To remove a node from quarantine, you can authorize or deauthorize the node. An authorized node is granted access as the permission group that you specify. A deauthorized node is refused access and removed from the system. You can also deauthorize any downstream broker or node that has previously been authorized.
When quarantine is disabled on a broker, any link can connect to the broker without approval.
To authorize a broker or link:
Right-click sys > quarantine > Authorize.
A list of quarantined nodes appears.
- For DsId, choose the node that you want to authorize.
- For Group, choose the permission group that you want to assign.
- Specify a name, and click Invoke.
To deauthorize a broker or link:
Right-click sys > quarantine > Deauthorize.
A list of quarantined nodes appears.
- For Name, choose the node that you want to authorize.
- Click Invoke.
Permission Groups
In DSA, you assign permission groups to users. Permission groups are defined within dsa/dglux-server/server.json. Information about permission groups can be found here. Any user with "superuser" enabled has the maximum permission level and does not need a permission group defined.
More information about DSA permissions can be found here.
Users
To create a new user:
- Right-click sys > users, and choose Create User.
- Without moving the mouse pointer away from the pop-up window, enter a user name and password, and specify whether the user has superuser access.
- Click Invoke.
To edit a username:
- Right-click sys > users > [username], and choose Rename User.
To edit a user password:
- Right-click sys > users > [username], and choose Change Password.
- Enter the new password, and click Invoke.
To edit a user's permission group, landing page, or other user properties:
- Right-click sys > users > [username], and choose Edit User.
- Edit the properties, and click Invoke.
To delete a user:
- Right-click sys > users > [username], and choose Remove User.
Using This Wiki

