Dataflow
This page describes dataflow in DGLux5. It also explains the basic operations for using dataflow.
For detailed definitions of dataflow block properties, see the dataflow blocks reference.
Dataflow Overview
Dataflow is a visual programming environment. You use dataflow to create dataflow models. A dataflow model is composed of blocks that do assigned tasks when requirements are met. A dataflow model is not a set of commands that are executed in sequence.
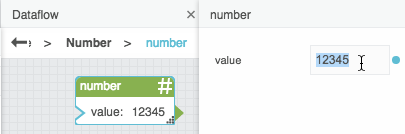
You access dataflow in an undocked panel called the dataflow view. In the leftmost portion of the dataflow view, the block palette contains blocks that you can add to the dataflow. In the center of the dataflow view, the dataflow window displays a dataflow model. In the rightmost portion of the dataflow view, the block properties panel shows properties of the currently selected block. The following image shows the three portions of the dataflow view.

| 1 | Block palette | 2 | Dataflow window | 3 | Block properties panel |
Each dataflow model belongs to a parent object. The parent of a dataflow model can be any of the following:
- The Stage, or root component, of any
.dg5file - Any dataflow block
- An entire project, using the Project Dataflow
- Certain nodes in the Data panel
How to Open the Dataflow View
Typically, only one dataflow model can be open at a time. The exceptions are Project Dataflow and dataflow symbols in symbol editing mode.
You can open the dataflow model for a parent object, or you can open Project Dataflow.
How to Open a Dataflow Model
To open a dataflow model for a parent object, do one of the following:
- Right-click the parent object in the Outline, Document window, or Dataflow window, and choose
 Dataflow.
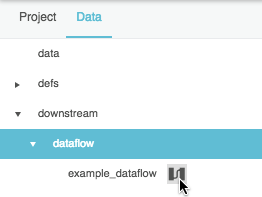
The following image demonstrates how to open a dataflow model via the Data panel.
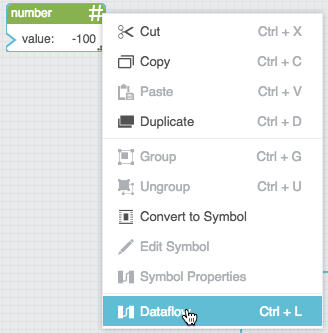
The following image demonstrates how to open a dataflow model via the Document window.

The following image demonstrates opening a dataflow model via the dataflow window.
How to Open Project Dataflow
To open Project Dataflow:
- Ensure the relevant project is open.
- In the Main Menu, select Modify > Project Dataflow.
Dataflow Blocks
When you create a dataflow model, you add blocks to the model and then edit the properties of the blocks.
This section describes how to add, select, rename, move, delete, and group dataflow blocks.
The following colors are used to represent blocks:
- Variable blocks are green. These blocks store a value.
- Data service and Browser API blocks are red. These blocks access a path and read or write information at that path.
- Operation blocks are orange. These blocks receive an input value or values, perform an operation, and return the result.
How to Add a Block
You can add a block via one of these methods:
- The block palette
- The Data panel
- The Metrics panel
- A binding
- An action
How to Add a Block via the Block Palette
You can add most blocks via the block palette by using the following steps:
- Find the block in the block palette.
- Do one of the following:
- Drag the block, and drop it on the dataflow window.
- Click the block in the block palette.
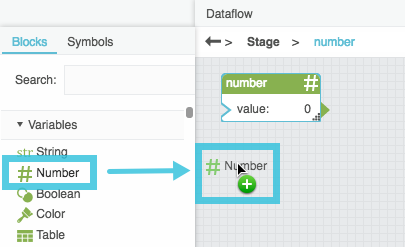
The following image demonstrates how to drag a block from the block palette.
Note
You can use the block palette’s Search function to find blocks quickly.
How to Add a Block via the Data Panel
The following interactions add blocks via the Data panel:
- As a shortcut, to add a Get Children block, drag the relevant node from the Data panel, and drop the node on the dataflow window.
- To add a BQL block, if the BQL block is available to you, click
 Menu, then click and drag bql, and drop bql on the dataflow window. This block cannot be added via the block palette.

How to Add a Block via the Metrics Panel
The following interactions add blocks via the Metrics panel:
- As a shortcut, to add a Load Value block, drag a metric from the Metrics panel, and drop the metric on the dataflow window.
- As a shortcut, to add a Load History block, drag a
 History icon from the Metrics panel, and drop the icon on the dataflow window.
 - To add an Invoke Action block, follow the steps in Invoke Action. This block cannot be added via the block palette.
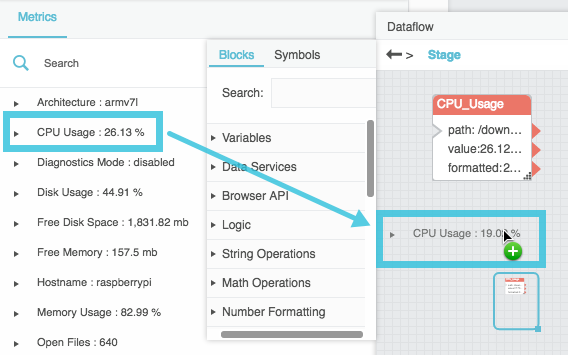
The following image demonstrates how to add blocks via the Metrics panel.
How to Add a Block via a Binding
The following actions add a Query Binding or Value Binding block via a binding. These blocks cannot be added via the block palette.
- To add a Query Binding block, follow the steps in Query Binding.
- To add a Value Binding block, follow the steps in Value Binding.
How to Add a Block via an Action
When you create an action for a parent, a corresponding dataflow block appears for the same parent. See Actions.
How to Select a Block
When you select a block, you can move the block and see its properties in the block properties panel.
Selected blocks have a blue outline in the dataflow window.
The following actions affect block selection:
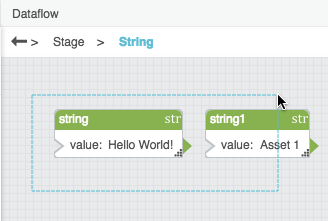
To select one block, click the block title bar.
The following image demonstrates selection of one block.
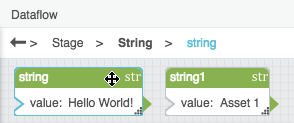
To select multiple blocks, click an empty area in the dataflow window, and drag to create a selection rectangle.
The following image demonstrates how to drag to select blocks.
- To add a block to the selection or remove a block from the selection, hold Shift on Mac, or Ctrl on Windows, and click the block's title bar.
How to Rename a Block
You can give blocks meaningful names to keep your dataflow easy to read.
You can change the label only, or you can change both the label and the name of the block in the page code. You might want to change the page code name if you use script heavily in your project.
Warning
Changing the page code name of a block might break any bindings that use that block.
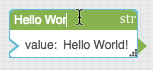
To rename a block:
- Double-click on the block title.
- Edit the block name.
- Press Enter or Return to change the label only, or press Ctrl + Enter to also change the name of the block in the page code.
The following image demonstrates how to rename a block.
How to Move a Block
You can move blocks. Block positions are saved when you save the page.
To move a block:
Click the block title bar and drag.
This step moves all blocks that are selected.
See also: Snapping.
How to Delete Blocks
To delete blocks:
- Select one or more blocks.
- Press the Delete or Backspace key.
How to Group Blocks
When you group dataflow blocks, the blocks are replaced by a single orange block that represents the group, and the grouped blocks become part of this new block's dataflow model. You can right-click the new orange block and choose Dataflow to see the blocks inside the group.
To group dataflow blocks:
- Select one or more blocks.
- Right-click a selected block, and choose Group.
How to Ungroup Blocks
To ungroup dataflow blocks:
- Select the block that represents the group.
- Right-click the selected block, and choose Ungroup.
Block Properties
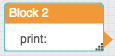
Blocks can have two types of properties: input/output properties and output properties. An input/output property can take an input value and give an output value. An output property can give an output value but cannot take an input value.
The following image shows an input/output property.
The following image shows an output property.
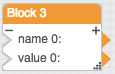
How to Add and Remove Input/Output Properties
For certain blocks, you can add input properties by clicking the plus sign (+) in the block, and you can remove input properties by clicking the minus sign (−). There is no limit to the number of input properties for such a block.
The following image shows a block with a configurable number of properties.
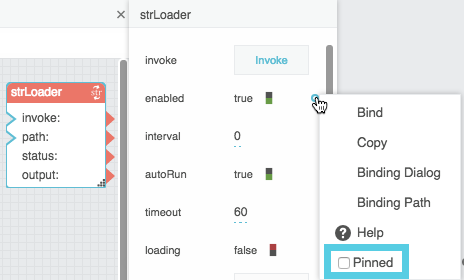
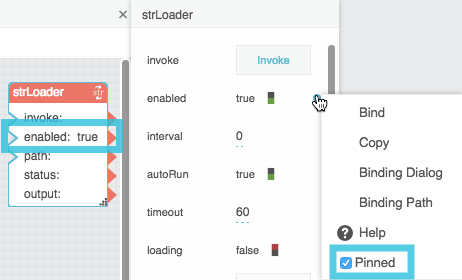
How to Pin and Unpin Properties
All of a block's properties are shown in the block properties panel. Properties are visible in the graphical dataflow view only if they are pinned. Certain properties are pinned by default. You can pin and unpin properties.
To pin a property of a block:
- In the block properties panel, hover over the property until a blue dot appears.
- Click the blue dot, and check the check box for Pinned.
To unpin a property of a block, uncheck the check box.
The following image shows an unpinned property.
The following image shows a pinned property.
How to Set Block Property Values Manually
You can manually set the value of an input/output block property using the block properties panel.
To set property values:
- Select the block.
In the block properties panel, edit the value.
How to Use Arrowheads to Create Bindings to Block Properties
You can cause a block property to determine a block property. Such connections are called bindings and are represented with wires.
All pinned properties have an arrowhead on the right that you can drag to create bindings. Only input/output pinned properties have a cutout triangle on the left that can take an input.
To use an arrowhead to create a binding:
- Click and drag the arrowhead of the source property.
- Drop the arrowhead on the cutout triangle of the target property.
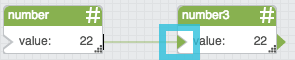
The following image demonstrates a binding between two properties of the same block.
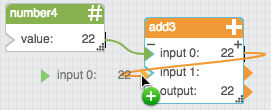
The following image demonstrates a binding between two blocks.
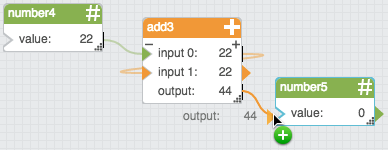
The following image shows some completed bindings.

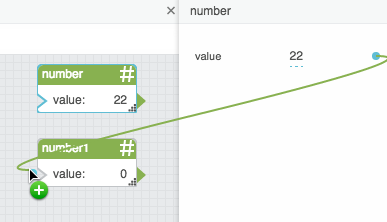
The following image shows binding one source property to multiple target properties.

How to Bind Block Properties using the Block Properties Panel
You can also create bindings using the blue dot in the block properties panel, like any other DGLux5 binding.
The following image shows how to create a binding from the block properties panel to the dataflow window.
How to Bind from a Component to a Block
To bind an element property to a block property:
- Hover over the element property in the Property Inspector, until a blue dot appears.
Click the blue dot, and drag it to the label of an input/output block property.

Example of binding from property inspector to block in dataflow window
How to Bind from a Block to a Component
To bind a block property to a component property:
- Click the label, arrowhead, or blue dot of any block property, and drag it to the component property in the Property Inspector.


Example of binding from block in dataflow window to property inspector
How to Find the Valid String to Bind to an Enum Property
You can bind a string property to an enum property. Only one specific, case-sensitive string is valid for each enum value.
To see the valid string:
- Make sure the enum property is pinned.
Choose a value for the enum property.
The valid string appears in the visual block in the dataflow window. The valid string might be different from the value in the drop-down menu in the block properties panel.
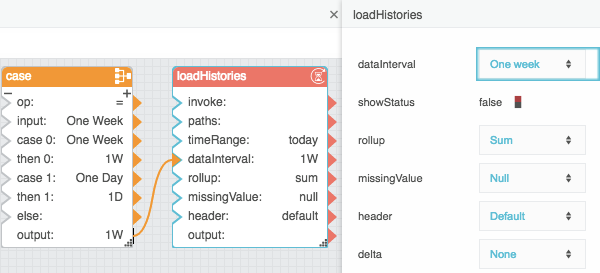
The following image shows an example of how to find valid strings for enum values. In this example, for the dataInterval property, "1W" is a valid string. For the rollup property, "sum" is a valid string.

In the following image, the list option "One Week" corresponds to the Case block output "1W". This Case block output is bound to the enum property.
How to Use the Arrowhead to Delete a Binding
Deleting a binding does not typically change the value of the property that was the target.
To delete a binding using the arrowhead:
Double-click the filled-in triangle of the target property.
The binding and the wire depicting it are deleted.
How to Use the Block Properties Panel to Delete a Binding
See: Deleting a Binding.