Actions
An action is triggered by an event, such as a click. When triggered, an action causes one of eight different effects. In the case of the Set State action, the effect can be reverted by a second trigger.
These are the eight types of actions:
- Set State—Changes the property values of one or more elements.
- Open Web—Open the specified URL.
- Download File—Downloads a file.
- Play Sound—Plays a sound asset.
- Open Page—Opens a
.dg5file. - Close Page—Closes the current
.dg5file. - Logout—Logs the user out of DGLux5.
- Data—Interacts with data metrics.
Important Uses for Set State Actions
Set State actions are useful when you want to allow multiple sources to trigger the same event. You cannot bind two properties to the same trigger, but you can create two Set State actions, or two State blocks, each of which invoke the same trigger.
Set State actions also allow you to affect the Project Dataflow.
How to Create a New Action
You can create a new action via the Actions panel. In the case of Set State or Data actions, you can also create an action via the dataflow without using the Actions panel.
How to Create a New Action via the Actions panel
To create an action via the Actions panel:
- Select the component.
- Open the Actions panel, behind the Property Inspector.
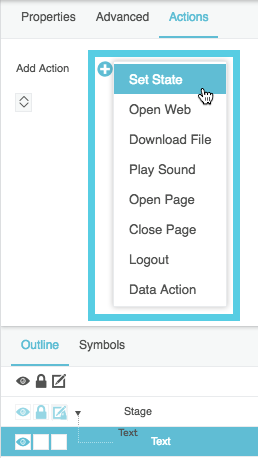
Click
 Add Action, and choose the action type from the list, as shown in the following image.
How to Create a Set State Action via the Dataflow
To create a Set State action via the dataflow:
- Open any dataflow model.
- Add a State block.
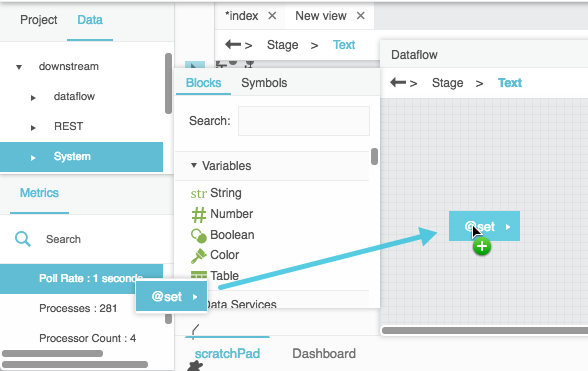
How to Create a Data Action via the Dataflow
To create a Data action via the dataflow:
- Open any dataflow model.
- In the Data panel or Metrics panel, find the data action that you want to create. Available data actions can be found in right-click menus on data nodes or metrics.
Drag the action name from its right-click menu to the dataflow window, as shown in the following image.
How to Edit an Action
When an action is created, its properties appear in the Actions panel and in the dataflow. You can edit the action in either of these places.
How to Specify a Triggering Event
To define the event that invokes or reverts an action, you can use the Actions panel or you can use a binding.
How to Specify Events via the Actions Panel
These steps allow you to specify a mouse event that belongs to the currently selected component.
- Click the drop-down menu next to Command in the Actions panel.
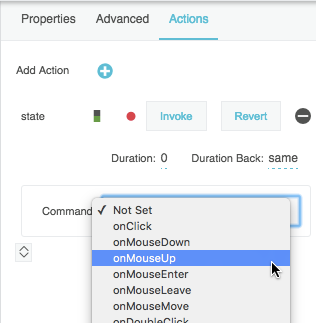
In the case of a Set State action, you can also specify a revert trigger by choosing one of the following commands:
- onClickOn & Off: The first click invokes the action. The second click reverts the action.
- onMouseDown & Up: Clicking and holding the mouse button invokes the action. Releasing the mouse button reverts the action.
- onMouseEnter & Leave: Moving the cursor over the object invokes the action. Moving the cursor away from the object reverts the action.
- onDragOver & Leave: Dragging an object over the object invokes the action. Releasing the mouse button or moving the cursor away from the object reverts the action. In order to use onDragOver & Leave, you must enable the draggable Advanced property of the object to be dragged, and you must enable the droppable Advanced property of the object that owns the action.
How to Specify an Event via a Binding
These steps allow you to specify any event that belongs to any component. These steps use the Advanced Properties panel, but you can also find various event properties in the dataflow or the Property Inspector.
- To use an Advanced property, select the component that owns the property, and then select the Advanced tab behind the Property Inspector.
Hover over the event, and double-click the blue dot, as shown in the following image.
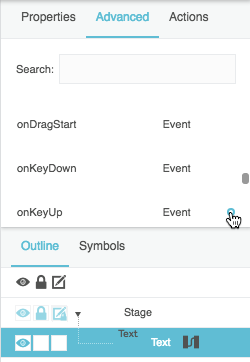
A binding pop-up appears representing the event.
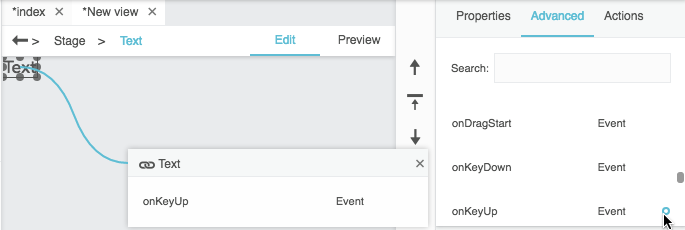
- Select the Actions tab.
Create a binding from the event in the pop-up to the Invoke or Revert trigger for the action.
Binding an event from the Advanced properties- Close the pop-up.
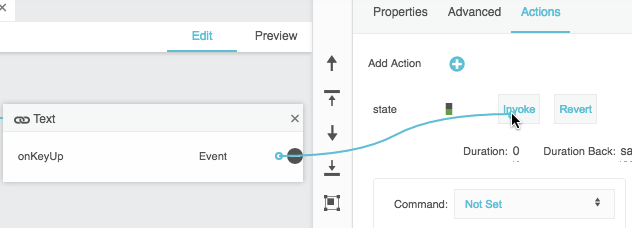
Action Sequences
To create multiple actions that will occur in sequence:
- Create the actions.
- Open the dataflow.
Create a binding from the onFinished or onComplete event of the first action to the Invoke trigger of the next action.
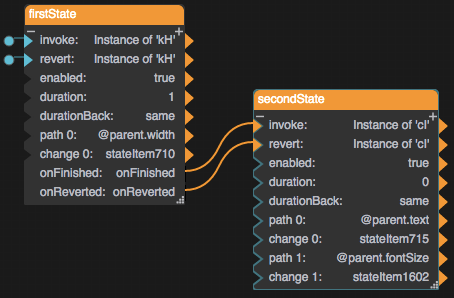
A sequence of events
Some action types do not have an onFinished or onComplete event.
How to Edit a Set State Action by Recording
Set State actions change the properties of one more more elements. To specify the paths and values of these properties, you record property changes.
Note
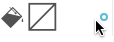
In order for a Set State action to revert properly, the property must have a value set before the action is invoked. The set value can be null or No Fill. A filled-in blue dot indicates that a property has been set.
The following image shows a property set to No Fill:
The following image shows a property that has not been set:
Tip
Instead of recording, you can set paths and values using the State block in dataflow.
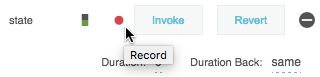
To record a Set State action:
In the Actions panel, hover over the action, and then click
 Record, as shown in the following image.
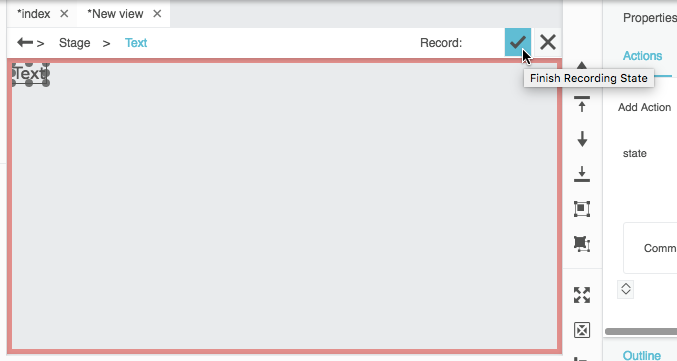
While you are recording, a red flashing rectangle surrounds the document window.
- Use the Outline and Property Inspector to change all of the properties that you want to change when the action is triggered and revert when the action is invoked.
Click
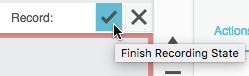
 Finish Recording State, as shown in the following image.
Tip
You can use the Duration property to animate the change over a number of seconds.
How to Bind to the Value in a Set State Action
These steps allow you to create a Set State action that changes a property to a bound value instead of an absolute value.
To create this effect:
- Follow the steps in How to Edit a Set State Action by Recording, but in step 2, set the value to a dummy value.
- Open the dataflow that contains the State block.
- Click and drag the binding source.
Drop the binding source on the change n property.
The binding replaces the dummy value.
How to Edit a Set State Action via the Advanced Popup
After creating a Set State action, you can edit it via a special popup.
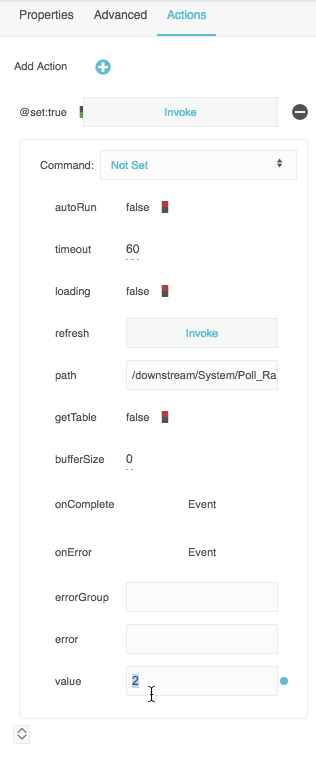
You can open this popup via the dataflow window or the Actions panel. To open the popup, click the  i icon for the property, as shown in the following image.

Note
The Revert trigger causes the property to change to the value that appears as original in the Advanced Popup. At the time of reversion, the original property overrides the property value set in the Property Inspector. If you change the property after creating the action, you might not see the property you expect upon reverting. If that happens, edit original or re-create the action.
This popup lets you edit the original and changed property values, as well as the following animation preferences:
- easing and easingBack: Specifies the rate of change over time for animation when invoking and reverting, respectively. The value of easing or easingBack can be one of the following:
- Linear: The animation's rate of change is constant.
- Ease In: The animation starts slowly and accelerates linearly as it executes.
- Ease Out: The animation starts with a fast change rate and decelerates linearly as it executes.
- Ease In Out: The animation starts slowly, accelerates linearly, and then decelerates linearly as it executes.
- Cubic In: The animation starts slowly and accelerates cubically as it executes.
- Cubic Out: The animation starts with a fast change rate and decelerates cubically as it executes.
- Cubic In Out: The animation starts slowly, accelerates cubically, and then decelerates cubically as it executes.
- Elastic In: The animation's rate of change starts on a small-amplitude sine wave. The sine wave grows as the animation executes.
- Elastic Out: The animation's rate of change starts on a large-amplitude sine wave. The sine wave decays as the animation executes.
- Elastic In Out: The animation's rate of change starts on a small-amplitude sine wave. The sine wave grows and then decays as the animation executes.
- Bounce: The animation starts with a fast change rate, and decelerates to zero with an effect similar to a ball falling and bouncing on a floor.
- strength and strengthBack: Affects the differential or the change rate of the easing or easingBack function. A value of 0.5 is the default. Values below 0.5 decrease the differential or the change rate, making the easing appear less pronounced. Values above 0.5 increase the differential or the change rate, making the easing appear more pronounced.
How to Edit an Open Web Action
Open Web actions open the specified URL.
When you edit an Open Web action:
- Use a full URL, including
http://orhttps://. (Optional) Use the Target property to specify where the file should open.
See an online reference like this one for more information about targets.
How to Edit a Download File Action
Download File actions download the specified file.
When you edit a Download File action:
- The file can be a path relative to the root of this project, or it can be an absolute path to a file outside the project.
- For a file in this project, drag the file from the Project panel to the Input property.
- For Type, specify path to download the file at the path specified by the Input field. Specify data to download a file that contains the object or string in the Input field.
- (Optional) For File Name, specify the name and extension that the file should have when it is downloaded.
How to Edit a Play Sound Action
Play Sound actions play the specified sound asset.
When you edit a Play Sound action:
- The URL can be a path relative to the root of this project, or it can be an absolute path to a file outside the project.
- For a file in this project, drag the file from the Project panel to the Input property.
How to Edit an Open Page Action
Open Page actions open the specified .dg5 file. They can be used to create Back and Forward buttons.
When you edit an Open Page action:
- For Destination, choose back if this is a Back button, forward if this is a Forward button, or dashboard if this button should open a specific
.dg5. - For Dashboard, enter the
.dg5file path. - Set Self to TRUE if the page should open in this tab, FALSE if it should open in a new window or tab.
How to Edit a Close Page Action
Close Page actions close the current .dg5 file.
A Close Page action's only editable properties are its invoke trigger and whether or not it is enabled.
How to Edit a Logout Action
Logout actions log the user out of DGLux5.
A Logout action's only editable properties are its invoke trigger and whether or not it is enabled.
How to Edit a Data Action
Data actions execute available actions on the data source.
To edit a data action:
To specify an action, right-click the data node or metric to display a list of actions, then click the action you want to use, and drag it to drag data action here in the Actions panel, as shown in the following image.

The parameters for the action appear in the Actions panel and the dataflow, as shown in the following image. These parameters depend on the action that you chose.
How to Test an Action
To see how an action works at runtime, use Preview mode or the Viewer.
To revert a Set State action while testing, click its Revert trigger in the Actions panel.
How to Delete an Action
To delete an action:
- Hover over the action, and click
 Remove.
Command Types
These are the command types available in the Actions panel:
- onClick
- onMouseDown
- onMouseUp
- onMouseEnter
- onMouseLeave
- onMouseMove
- onDoubleClick
- onRightClick
- onClickOn
- onClickOff
- onMouseUpGlobal
- onMouseWheel
- onDragStart
- onDragEnd
- onDragOver
- onDragLeave
- onDragDrop
- onClickOn & Off
- onMouseDown & Up
- onMouseEnter & Leave
- onDragOver & Leave
For descriptions of these commands, see an event handlers reference like this one.
onClickOn and onClickOff are events that can work together to invoke and revert an action.
A command with an ampersand (&), such as onClickOn & Off, assigns events to both the Invoke and Revert triggers, if the action is a Set State action. A command with no ampersand assigns an event to the Invoke trigger only.
Action Dataflow Blocks
Dataflow blocks automatically appear in the dataflow when you create an action. You can use these blocks to edit your action.
See Dataflow Blocks Reference.
How to Enable a Mouse Event on an Object that Is behind Other Objects
See clickThrough.
Tutorial: Create a Submit Button
In this tutorial, you use Set State actions to create a button that changes appearance on hover and on mouse down. Then, you use a Data action to set a data value when the button is clicked.
To create this Submit button:
Add a text input component and a text component to the Stage, as shown in the following image.
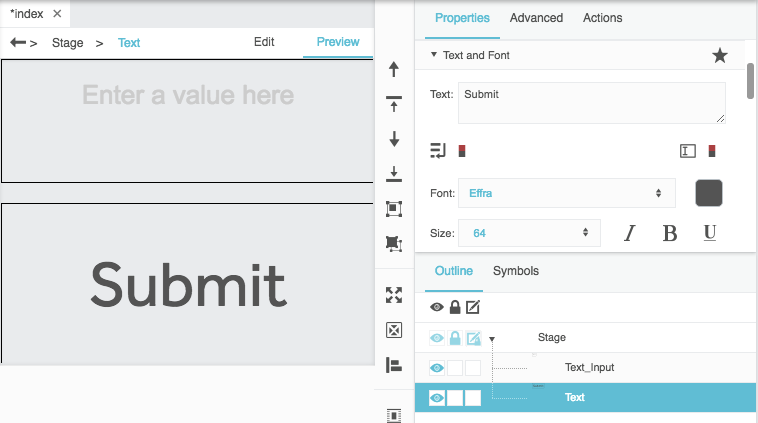
Set the Fill property of the text component to a non-null value, as shown in the following image.

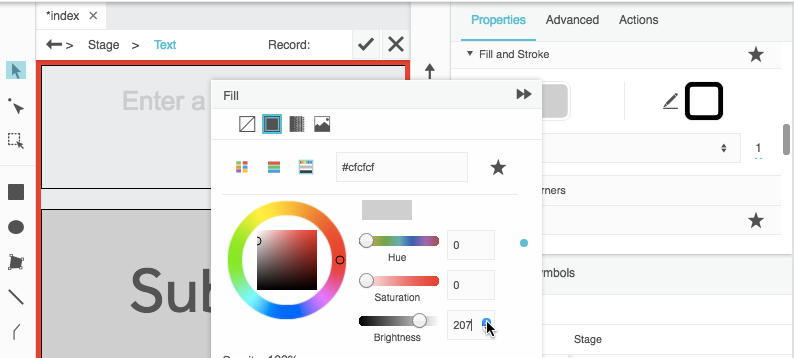
Give the text component a box shadow effect with an alpha value of 0%, as shown in the following image.

- To change color on hover, create a Set State action on the text component:
- In the Outline, choose the text component.
- Choose the Actions panel, behind the Property Inspector.
Click
Add Action, and choose Set State, as shown in the following image.
- For Command, choose onMouseEnter & Leave.
Click
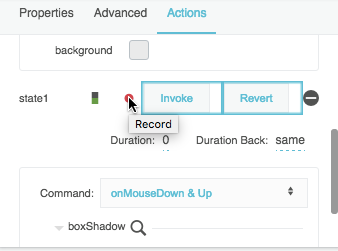
Record, as shown in the following image.
Change the background fill of the text component, as shown in the following image.
Click
Finish Recording State, as shown in the following image.
- To test your hover action, use Preview mode and move the cursor over the Submit button.
- To change the shadow alpha on mouse down, create a second Set State action on the text component:
- Click Add Action, and choose Set State.
- For Command, choose onMouseDown & Up.
Click the
Record button next to the second action, as shown in the following image.
Change the alpha value of the box shadow to 100%, as shown in the following image.

- Click Finish Recording State.
- To test your mouse down action, use Preview mode and click the Submit button.
- To commit data on click, create a Data action on the text component:
- Click Add Action, and choose Data Action.
- For Command, choose onMouseUp.
Right-click a writeable data metric, and drag the @set, Set, or similar action to drag data action here, as shown in the following image.
Available data actions vary based on your data source.
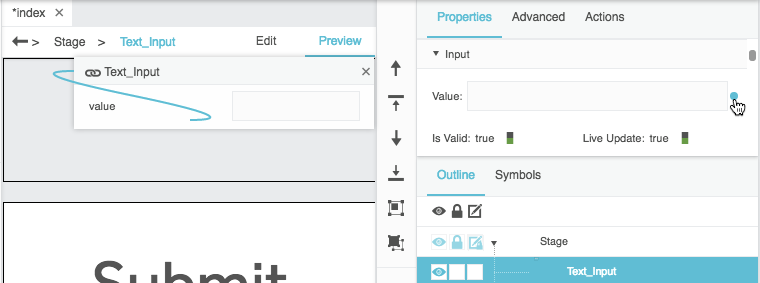
- In the Outline, choose the text input component.
Hover over the Value property and double-click the blue dot to open a small binding pop-up for this property, as shown in the following image.
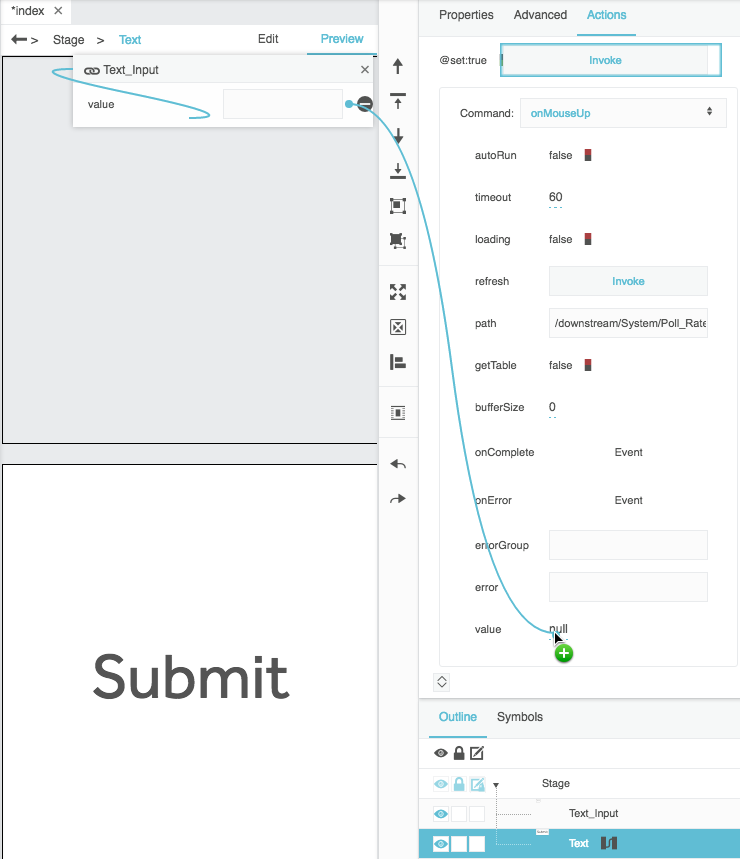
- Re-select the text component and the Actions panel.
Bind the value of the text input component to the value property of the data action or a similar property, as shown in the following image.
To test your data action, use Preview mode. Enter a value in the text input component and click the Submit button.
The metric value in the Metrics panel changes.
The following image demonstrates the results of clicking the Submit button:

Video Tutorial: Creating Interactivity
Video Tutorial: Data Binding and Data Actions
Video Tutorial: Using an Action to Download CSV of a Table
More Resources
This community forum post shows a use case for creating actions: